|
| 当前位置 : 首 页 >> 技术支持 >> 正文阅读 |
|
|
|
|
发布时间:2011/3/25 来源:offroaders.com 作者:绞盘专家组 点击数:
|
|
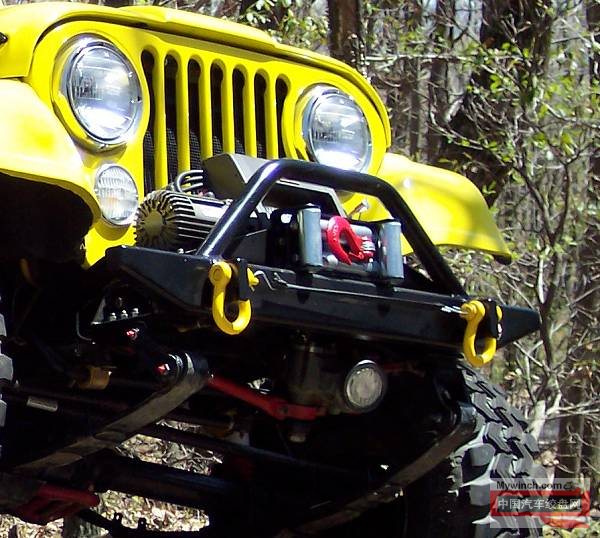
这是一篇在offroaders.com登载的《Warn 9500i Winch Installation & Custom Mount Plate》原创文章,记录了在CJ-7上安装二手绞盘的全过程,非常值得参考。有相应的中文版本请 点击浏览 ,原文发布在 offroaders.com 。
Eventually I was going to get a winch. Either after getting stuck real bad or coming upon a deal I couldn't refuse. Only once could I have used a winch, and that was at Paragon one chilly April day when I was high centered on a bolder during a hill climb. It wasn't long after though that I found a deal on a Warn 9500i. After a minor repair, I bought the winch off of a friend and he bought a new one. The following describes the installation on the very custom Project CJ-7, including a custom fabricated mounting plate and the wiring of the winch using some left over parts from an 12 volt APC backup power supply. No, not like the one under your desk at work but rather a monster UPS that contained 12 car batteries to supply power to 10 Web servers for 5 to 6 hours of reserve power.
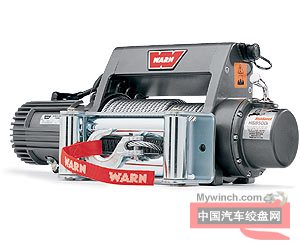
This winch spent the first several years of its life attached to the front of a friend's 1996 Toyota Land Cruiser until one day during some landscaping around his pond a bulldozer got stuck. A few really hard tugs of the Warn 9500i winch started to move the bulldozer but it was just too much and something snapped in the Warn Winch. He made the decision to upgrade the Winch at that time and I offered to buy this Warn Winch from him after the repairs were made to it by a local shop. Turns out the damage was minor and the broken part cost about $35. I'm not sure what it was that snapped but it was probably a part meant to break before major damage would occur. Kind of like a fuse or a cheap built in weak point.
Inspection, Cleaning, Painting
The used winch had spent its previous life outside in all kinds of weather for years but surprisingly had little evidence of that aside from a little fading of the paint and a minor amount of rust around the bolts and on the spool. The cable that came with the winch when it was new was never used, having been replace with a Synthetic Winch Rope instead. The 4-Way Roller Fairlead was also unused and in new condition.
After a thorough inspection of the housing and a jumper cable test to verify that the winch was working, it was time to clean it up and touchup the paint where it was needed. A quick wipe down of Simple Green got the layers of dirt off with a little help of an old toothbrush in the motor cooling fins.
I gave the spool a quick sandpaper scrub to get the rust off and wire-brushed the rusted bolt heads. Using some gray-metal Rustoleum and a paint brush, I touched out the housing up to a like-new condition. The spool was sprayed with a gloss black. I also painted the Roller Fairlead's bracket gloss black after removing the rollers. After bringing the Winch up to a like-new appearance, it was time to fabricate a mounting a plate.
Fabricating a Mounting Plate
I probably could have bought something aftermarket to mount the winch but what fun would that be? Besides it's probable that the outrigged front suspension hangers would have been in the way of any aftermarket system for mounting a winch so I fabricated my own design. The mounting plate was quite simple in design, yet probably much stronger than anything I could have bought.
I started with a flat plate of 1/4 inch steel measuring 32 x 8 inches that when from frame rail to frame rail. Bolt that held my bumper on at the top from the frame rail were inverted so that the 4 1/2 Grade 8 bolts stuck up. I used longer bolts so I had enough to work with.
4 holes were drilled into the plate so the plate could drop down onto the 4 bolts, which already had nuts on them. The plate rests on these 4 nuts with 4 additional nuts and lock washers holding the plate down. Unfortunately I don't have pictures of it during the fabrication but the after pictures should suffice.
With the plate drilled out for the 4 holes toward the front out on the ends (see image to the right) the plate was lowed onto the bolts and bolted down temporarily. The winch was then lined up and measured to exactly where I wanted it and the plate was marked. I took the winch and the plate off, then flipped the winch over to make a template of the 4 bolt holes under the winch. The template was the shape of the footprint of the winch and had the holes cut out. So I could lay the template on the plate and marked the holes. Then the holes were drilled out.
Since the winch plate was only held onto the frame by the 4 bolts and they were forward of the plate's center, I needed a way to attached the rear of the plate to the frame. The outrigged hangers were in the way of grabbing the frame directly below, so I came up with a way to reach back to the bolt that the sway bar hangers attached to. Using 1/4 x 2 1/2 inch steel plates and a length of angle iron, I made a rear attach point that used an existing bolt hole in the frame and replaced the swaybar's bolt with a grade 8, slightly longer bolt, nut and lock washer.
The angle iron was welded to the sections that reach back to the bolt. The angle iron was then attached to the plate by 4 grade 8 bolts. It took a few times of mounting the plate, measuring, pulling off, then remounting to get it right but ultimately it was a pretty effective way to use an exiting hole in the frame and stiffen up the whole winch mount plate and securely attach it to the frame with 4 1/2 inch grade 8 bolts and 2 7/16 grade 8 bolts towards the rear.
Mounting the Roller Fairlead
For the roller fairlead, I took two pieces of angle iron and cut them on angles to taper them down towards the outer ends. This was mainly for visual effect. Two 3/8 inch grade 8 bolts held each roller fairlead upright support to the winch mounting plate.
I also had to notch out for the outer bolts coming up from the frame. The inner faces of the angles were drilled out for the Roller fairlead.
Everything was bolted up together a final time for clearances and to make sure everything was right. Then broken down again for a paint job of gloss black.
Wiring the Winch
With the paint finally dry after a few days, I bolted everything up again with grade 8 hardware, then proceeded to wire it up. Wiring the winch is pretty basic. You have two heavy gauge wires, a red and black, that get run to the battery.
I ran these two heavy wires back along the passenger side, under the grill and secured it atop the frame rail back to the rear of the passenger wheel well.
Where the wire ran up and around the corner of the fender's lower edge, I put it inside of split wire loom or automotive corrugated flex tubing as some call it. This was to protect the wire from abrasion.
Quick Disconnects and a Fuse
Recently I scrapped a massive APC Battery backup that would supply 120 volts for computers. The power was stored in 12 volt car batteries, 12 batteries total with 4 in each unit. The batteries were connected using these heavy gauge quick disconnects and the 4-battery units themselves were interconnected using even heavier gauge clips and wire. I kept all of the clips and used a set of the heavier gauge wires and clips.
Fusing the Winch
There were also some serious fuses in each unit. 200 Amp slow blow fuses. One is pictured to the right. I checked out the specs of these fuses and found that they can take a rather high amp draw for about 10 seconds before tapering down to the rated 200 amp. I put one of these in-line along the positive line, between the winch cable and the quick disconnect cable. I've never seen anyone fuse a winch before but I have everything else fused (except the starter motor) so I though it might be a good idea in the case of a dead short. I've used the winch several times so far and the fuse is holding up.
One side of the quick disconnect I mounted to the battery tray support. This gave me a fixed end to yank the cable and disconnect the winch's power cable. When it's not in use, it's stashed under the tray where it hangs in the loop of the positive terminal cable.
Where the winches cable connected to the quick disconnects cable and where the other end of the quick disconnect cable would attach to the battery I used heavy duty copper terminal ends. The cable was dipped in flux, then soldered into the cap of the terminal end.
Where the terminal ends were to bolt together, I cleaned then with sand paper and used a dielectric grease to keep the ends from corroding.
The positive power cable from the winch was bolted to the Buss 200a fuse. From the battery mounted half of the quick disconnect was also bolted to the fuse. I actually wrapped the fuse in electrical tape and slid a short section of pipe over it and the ends of wire. This was because I have no idea what would happen if the fuse blew. It might go off like a fire cracker and I though it would be better contained than wide open.
The negative end of the winch cable was bolted to the quick disconnects negative side.
After all of the terminals were bolted together, they were well wrapped with electrical tape to prevent accidental grounding or contact with something.
One last thing ... I had to relocate the air supply coupling because the winch had to take up the space where the coupling used to come up off of the back side of the front bumper, which doubles as an air tank (along with the rear tank). I just extended the line with 1/2 nylon tubing, nylon NPT quick-disconnects an elbow and a short threaded extension.
Thoughts on the Warn 9500i Winch
The Warn 9500i is an impressive winch. I know this winch has seen plenty of use including a 2 hour ordeal where a Jeep YJ with a blow motor had to be towed back to camp. The only way back to camp included a long steep hill. This winch not only pulled the incapacitated YJ but also pulled a very heavy Toyota Land Cruiser up the hill as it was trying to pull the YJ. The hill was slick and the winch was doing most of the work in several long hard pulls. It's also come in handy a few times for me including once where I had to pull my old Toyota pickup truck, now owned by a friend, out of a mud hole. It has a fast line pull, yet has a high capacity. The broken part was cheap, 35 bucks and the fact that a cheap part broke when it was over loaded is a good thing. Overall, I'm very happy with it and hope to see many years of long service with this Warn Winch.
| |
|
|
|
|
 经典图文
经典图文 |

永磁直流电动绞盘,性价比首选

串激直流电动绞盘,越野专用

超强拉力的重载电动绞盘

液压绞盘:低廉价格获专业品质

品牌原装备附件:安装件、工具
|
|